View Settings
Learn about the view settings and custom views in the property and specification tables.
Written By Antonia Langner
Last updated About 23 hours ago
Use view settings to focus LastBIM’s property and specification tables on the information you need, and save them as custom views to switch between different overviews.
View Settings
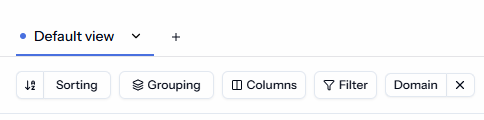
Directly above the table you find the view settings, each as a separate button:

Sorting: By default our tables are sorted alphabetically. You can switch the sort direction or choose another criteria for sorting. The grouping (by hierarchy or characteristic groups) remains in place unless you deactivate it.
Grouping: By default the specifications are grouped hierarchically and the properties are grouped by the LastBIM property sets. If you prefer a flat list without grouping/hierarchy, you can use the
Groupingbutton to deactivate it.Columns: You can add and remove all information about the properties and specifications as columns to and from the tables. Select the information you want to see and hide everything else to stay focused.
Filter: Use filters to show only properties or specifications that match specific criteria. You can combine multiple filters. You see all active filters directly in the view settings bar next to the filter button.
Create Views
You can save your view settings (sorting, grouping, columns and filters) in different views, so you can return to a specific overview at any time. Create a separate view for each purpose, for example one for all properties in review and one with approved properties, and switch between them whenever you need a different focus.
To create a view, click on the + button in the views bar or directly adjust the view settings in the current view and save them as a new view (s. Changed Views).
Saved views are shared by everyone in the project.
Changed Views
When you change the settings of a saved view, a blue dot appears next to the view’s name. It shows that the table no longer matches the saved view. You then have three options:
Save changes: Update the view with your current settings. The changes apply to everyone.
Reset: Discard your changes and return to the saved view settings.
Save as new view: Keep the original view unchanged and save your current settings as a separate view. To do this, click the arrow next to
Save viewand selectSave as new view.

Was this helpful?
Still need help? Share an idea